It’s the morning after attending a one-day event labeled “Whirlwind Textile Workshop” at MIT’s Media Lab and my mind is still racing as I’m trying to synthesize and make sense of my experiences. This was my first hands-on introduction to computational textiles and circuitry in general. Yes, I already knew about the two poles, and that circuits must remain intact (I had thrown circuit breaker switches) and even replaced a lamp switch in a favorite bedroom lamp via instructions, but in my undergrad product design classes, circuits were not on the syllabus. So I went into the workshop with little understanding of the materials I would be working with.
Leah Buechley, the workshop leader not only designed the LilyPad but heads up the High-Low Tech Group at MIT. (see
http://web.media.mit.edu/~leah/ ) Her passion & exuberance for computation textiles is abundantly apparent before, during and after her presentation igniting the room into constructing their first circuit, while a bevy of Leah’s students: Hannah (aka Plusea on Instructables) Emily, David & Bonifaz Kaufmann, a visiting student from Austria circled the room to lend their expertise when we faced a brick wall (or in this case a tiny light consumed by darkness). The center of the workshop table was filled with the supplies: Conductive thread & fabric, 9/13 needles, straight pins, LilyPads, switches, LED lights, battery holders, batteries, sensors, scissors, fabric crayons, puffy paints.
Supplies for the workshop.
WORKSHOP ADVENTURES
After gathering at a large oval conference table, introductions were given be each member, including attendees: Yasmin Kafai, Mike & Quinn from Penn State, Nichole Pinkard from University of Chicago, and Kylie Peppler & myself from IU. Leah then presented an introduction to a wide variety of computational textiles like designs on the runway, fabric screen projecting pillows, and a shirt that could gather medical information to be analyzed.
The presentation on electronic textiles includes runway fashions.
Next we looked as some other CT designs, like Leah’s lighting design activated by a breeze, a harp that activates a pyramid of lights, applications embedded into stuffed animals, Hanna’s design using a white body suit and a website entitled “Tentative Architecture of Other Earth” illustrating a knitted white sweater that seemingly breathed by reacting to the wearer’s mood and the ambient temperatures. (It reminded me of underwater sea plant movements – very subtle.)
Leah explains the parts of a simple circuit.
Next Leah discussed the elements of and layout of a simple circuit: a power source, LED with a negative-shorter pole and the positive-longer pole, and a switch. However Hanna showed us hand made switches, that could be used on designs, like the beaded pendulum (see
http://www.instructables.com/id/Fabric_amp_Bead_Tilt_Sensing_Bracelet/ ) which enables a random pattern of sensor responses (which may work for my “twirling” design project).
Hannah shows her circuits with handmade switches.
Then it was time to play! Each workshop member designed and constructed a working circuit. Kylie had brought two things to work on, one a cardigan she wore at IU and another a pair of purple fairy wings, both perfect for the circuits. I recently came across a term in a fabric store for the re-purposing of both articles: fashionology. The magazine defined it as “the simple science of transforming purchased clothing and accessories with easy embellishments.” In looking at my closet, I found a number of items that could be redesigned or re-mixed with embedded computational textiles (e.g. a colorful hand-drawn-type graphic Woodstock t-shirt). Therefore, I would go one step further and strike the words: purchased (e.g. you may decide to transform a handed down grandmother’s garment), simple (e.g. science is far from simple), and easy (e.g. CT does involve a learning curve).
Nichole sewed the power supply on the back center
with LED lights on the wings.
Kylie ended up focusing on her sweater so she passed the wings onto Nichole to embellish. I brought a patch to embed with electronics and connect it to a surface with Velcro so it could be placed/removed from anything. I thought it would be best to stitch the electronics on a layer of material behind the patch, or as Hannah pointed out, if I didn’t the stitching would show through the front of the patch…oh yeah! So I used the fabric crayons (yes…we had crayons!) to draw a road map of where the three elements needed to be sewn and a connecting path to sew with conductive thread. This helped me plan it out before I started and layout the parts in the proper direction the terminals were needed to connect properly (e.g. plus or minus) in the loop. I learned this from Yasmin, sitting beside me, when she sewed (quite beautifully!) a positive and negative together. She had to rip the stitching out and flip it. (I noted from her difficulty that the conductive thread is not easy to cut out.)
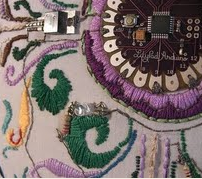
Kylie’s power switch was sewn on the sweater back with the
conductive thread curving around to the front for the LED light.
In my design, the most difficult part of my process was the placement of the light under the patch. I started to cut a hole in the patch, however, now I realize I should have simply used an LED light on the front of the patch (which I will probably change out.) And I may add more lights, although I don’t know if that is possible without using a LilyPad. (As you can see I’m still sketchy on how it all works together and need much more hands on play time!)

 Collaboration and an open workshop space added to the workshop success.
Due to the open nature of the workshop, conversations were happening instantaneously. We were learning from one another as we were all constructing our design. At one point in the conversation, Nichole responded to Kylie “You gave me wings!” We all laughed at her response, yet her simple statement was so poetic at the same time. Since we want all children to have wings to explore the possibilities that we were experiencing: to work in a community of learners, in a rich positive environment, be introduced to programming and design while learning valuable skills. In my opinion, the entire world needs to be given wings to experiment and participate as a lifetime learner.
After our lunch break (and Mike’s and my trip to the Coop: the MIT bookstore : -) the group worked on programming the LilyPad. I missed the intro, but it’s my understanding that the LilyPad allows the user to go light years beyond a simple circuit to program a sequence of actions. Downloading the Arduino software is very easy and Leah has instructions on her website for many of the basics that we covered for the next hour at
http://web.media.mit.edu/~leah/LilyPad/index.htmlFirst we attached the LilyPad to the laptops via a USB cable. Leah explained that the ports on the LilyPad are numbered for the digital connections and the A numbers are for analog circuits, which are the sensors. We worked on code for a simple blinking light and uploaded it, then the same procedure for a switch. (we were able to check all of our programming by using alligator clips to complete the circuit) Leah also discussed the colored lights, sound and various types of sensors listed on her website listed above.
TEXTILE FABRICATION
We then moved to the MIT High-Low Tech lab for the Textile Fabrication portion of the workshop. The main room of the lab is a large open area with worktables, desks with large tops holding brightly colored threads, yarns, bins with Arduino parts, and computers. A dressmaker model is close by, as well as a square of couches and chairs, perfect for brainstorming sessions.
Leah at the magnetic wallpaper wall.
To the left was a large free-standing panel with what looked like painted flowers, large electronic shaped drops and lights. Leah demonstrated the panel that was entirely magnetic with each flower group having a LilyPad controller, so lights and even crumpled colored tissue paper could easily be moved anywhere on the panel. This reminded me of the white board Joshua had been using in our apprenticeship class where objects could be physically moved around by the children through use of a special pen shaped object. Only this time no pen was needed, just the child’s hand was needed to move the 3D objects.
The lab tour continued with Hannah demonstrating the knitting machine that produced somewhat of an author drawn computer-generated imagery. The machine can be adjusted to the size of the imagery and can use two colors at a time, but colors can be switched out for others-leaving the possibility for interesting color combinations.
Mike works at the knitting machine with Hannah after
designing on the computer. Yasmin, Leah, Mike and Kylie
look through the book of knitted artifacts.
Then Emily demonstrated her project: fractal based embroidered designs pulled from nature with the variations randomly generated by the computer for the designer’s selection to be sewn by machine. One of the things I found interesting was the apparent random nature of both computer-generated designs. In contrast, David demonstrated a laser machine, that used a computer taken picture (in this case a stuffed sheep toy), then produced that image on fabric by extracting, or cutting out small dots of material. The image appears to be pixilated with larger dots extracted for light areas and smaller dots extracted for shaded areas.
Laser cutter starts to make the sheep image. Computer screen
shows the digital image cut into the red cloth.
DISCUSSION
After David’s demonstration a discussion started on how this technology could possibly be used in education. Mike expressed how he thought all of the technology could converge into printable fabric. Leah talked about how ink jets can be used for fabric printing. Yasmin, expressed interest in bringing back the Barbie Fashion Designer kit, which could use this technology. Kylie asked about the washability of the ink jet images…but this has yet to be tested. Nichole could see usage in the Chicago schools where the majority of students wear uniforms including white shirts, that could be changed up a bit with a design. (What a great idea to have a student design time!) Mike suggested how each person could be individualized and accessorize with designs. We also discussed the time factor needed in learning Arduino. Emily, who is self taught on Arduino, discussed her first experiences with Arduino and receiving a defective board, but she has a programming background so she picked it up easily with working parts. She revealed that her second LilyPad was missing soldering. Leah expressed concern about the Arduino boards working, but since SparkFun is making them there is no way to check this. Yasmin discussed the difference in age groups in the club environment: younger groups flitter around, but the older seem to stick with something longer and how this could impact what projects would work at the clubs.
REFLECTION
One of the basic questions I had been thinking about was why is computational textiles important? When I think of the combination of design, fashion and computation, I can’t help but smile at the thought of young girls everywhere taking what they love (design & fashion) and combining it with circuitry, LEDs, sounds and motion to construct an artifact that has special meaning to them. While male toys tend to include construction kits with motorized motors, gears to program and need higher-thinking skills, too often girls crafts are simple projects of stringing beads or gluing gems on a picture frame, butterfly or canvas bag. Recently a girl’s workshop in town was making cards…what if those cards could have lights, sound or looks like the card is breathing and it’s designed and programmed by youth? I’ve reflected on something similar before, in 1999, when conceiving a short film parody inspired by the pink Barbie isle, entitled “The Evil Among Us.” I noticed while Christmas shopping for my two great nieces at the Burbank Toys R Us store, that the preschool toys were all primary colors, the girls Barbie section is PINK (yes, it screams the color) and the boys section is generally a Hot Wheels blue. I thought of how these colors and toy selections divided childhood into gender roles by these toy color representations, and wondered how these labels influenced a child’s growth and more importantly their identify formation. In my short narrative a clueless librarian aunt gives her niece a Barbie who comes alive nightly then morphs into a wicked cackling entity. Evil Barbie’s goal was to change this soccer-loving girl into a pink frilly makeup-heavy fashion diva, through nightly brainwashing whispers into her sleeping ear along with little gifts of reinforcement (e.g. makeup, magazines, Brittany wall poster) left behind transforming not only her room, but also her identity. This previous exploration into identity through writing and production, is aiding in my sense making of not only my own research interests, but what CT could offer underrepresented groups in certain domains.
A more recent trip to the same toy store chain, to shop for my three granddaughters, ages 4, 2 and 2 months (who are already being immersed into the PINK world), found a few changes. The pink color has now migrated to a LEGO home building set, Lincoln Logs targeting girls and pink laptops, cameras, guitars and even drums. One has to wonder where all of this pinkness will lead and how computational textiles can add a rainbow of colors, instead of this extremely limiting range. Below are a few thoughts on the role of computational textiles:
1) We are all products of our environment, which includes toys/activities. Our experiences (play included) shape who we are just as our engagement and practice of social skills with our peers influences how we relate to others in the future. I want my granddaughters, and all children, to play and experience a wide variety of activities and interactions so they have a treasure chest of possibilities to draw upon instead of a very limited “toy isle” view of the world. CT would be a wonderful addition to the treasure chest, supplying endless choices and creations.
2) In our extremely pleasurable CT workshop experience, we discussed how there was little stress, yet we were making mistakes and through those mistakes learning together. In this lab environment, conversations can take place, brainstorming happens, materials are played with and problem-solving occurs all within this community of learners. Our CT workshop was likened to an engineering room processes. I personally could relate the workshop to our open film edit bays at USC, where we learned from one another while experimenting with our craft and supporting one another. This community model has previously been successfully studied and documented, for example Yasmin Kafai and Kylie wrote about the importance of the learning through design while drawing from your own interests in a community of learners in their new publication “The Computer Clubhouse.” Computational Textiles could play a valuable role in education at a time when the importance of teamwork, problem solving & social skills are being called for.
3) If we want to encourage participation of under-represented groups into a professional domain, l(e.g. computers and/or engineering) then there has to be an enticing introduction and personal early training experience in this domain. Emily, one of Leah’s grad students brought up her experience with her first LilyPad, which was defective. She spent over 20 hours trying to troubleshoot it before returning it. While she knew, if her brother (who had more experience) would have troubleshot it and known in half an hour it was a defective part and not his lack of experience. Emily’s example reminds me of Papert’s 1993 finding that learners, who are deeply engaged, don’t mind difficult activities. It also directly speaks to Csikszentimihalya’s 1991 finding that a deep engagement can exist in a challenging activity, but notes it should not be overwhelming. Emily’s trouble shooting was indeed something new, and it’s amazing that it lasted for 20 hours, but that only speaks to her determination and interest in the subject matter.


